Zeitschriften
Serials actions can be accessed by going to the ‚More‘ menu at the top of your screen and choosing ‚Serials‘ or by clicking ‚Serials‘ on the main Koha staff client page. The Serials module in Koha is used for keeping track of journals, newspapers and other items that come on a regular schedule. As with all modules, make sure you go through the related implementation checklist before using the Serials module.
- Get there: More > Serials
Manage serial frequencies
Koha kann Publikationsfrequenzen für deren einfache Verwaltung und mehrfache Verwendung speichern.
- Get there: More > Serials > Manage frequencies
From this page you can view all of the existing frequencies in your system
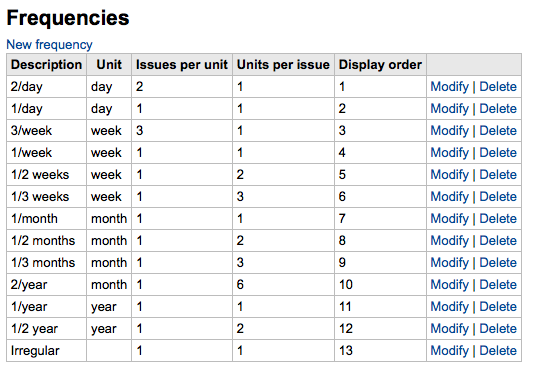
and create new ones.

Manage serial numbering patterns
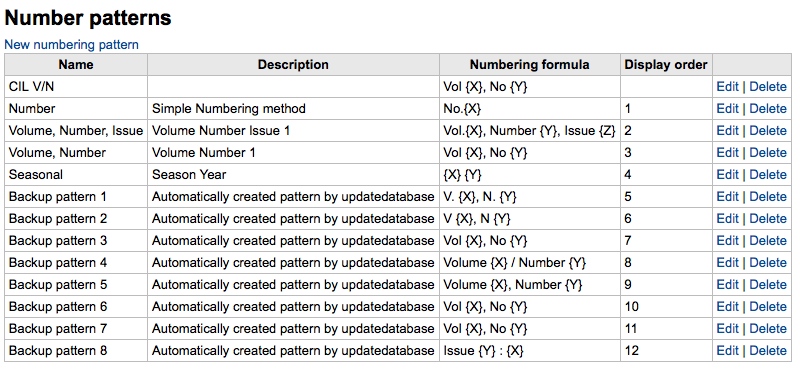
Everytime you create a new numbering pattern in serials you can save it for later use. These patters are accessible via the ‚Manage numbering patterns‘ page.
- Get there: More > Serials > Manage numbering patterns
Diese Seite zeigt Ihre gespeicherten Nummerierungsmuster sowie einige vorgefertigte Muster.
Hinweis
If you have upgraded from a previous version of Koha you will see ‚Backup patterns‘ listed for patterns used in version before Koha 3.14. This is how Koha saved your old numbering patterns. You can edit these to give them more meaningful names from here.
It will also allow you to create a new numbering pattern without first adding a subscription. To add new new pattern click ‚New numbering pattern‘ at the top of the list of patterns.
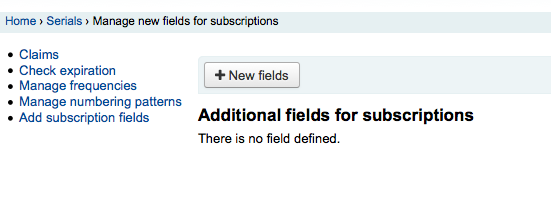
Custom subscription fields
This module will allow you to add custom fields to your serial subscriptions for reporting and searching.
- Get there: Serials > Add subscription fields
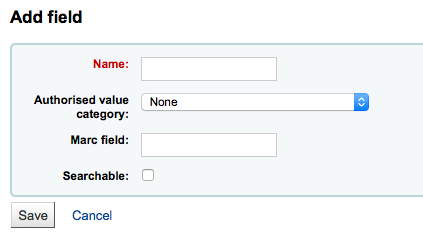
To add custom fields simply click the ‚Add subscription fields‘ link on the left of the Serial page and choose the ‚New fields‘ button
The form that appears will ask for either an authorized value or a MARC field to populate the field with
Name: enter the name of the field
Authorized value category: you can use authorized values to fill in this field.
MARC field: enter a MARC field that will be used to fill in this new field
Hinweis
You can only choose one of the two options.
If you choose the authorized value option, you will be able to fill in the new field upon the creation or modification of the subscription.
If you choose the MARC option, the field will be automatically populated with the corresponding record’s value for this MARC field.
Important
If you choose the MARC field, make sure you enter it in this format: field$subfield
For example: 515$a
Searchable: check this box if you want to be able to search your subscriptions using this field
Example 1: Additional field using authorized values
You might want to track which department you’re ordering this serial for
- In the ‚Name‘ field, enter ‚Department‘
- In the ‚Authorized value category‘ field, choose DEPARTMENT
- Check the ‚Searchable‘ box
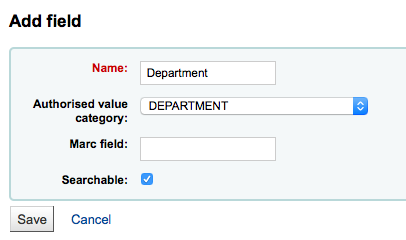
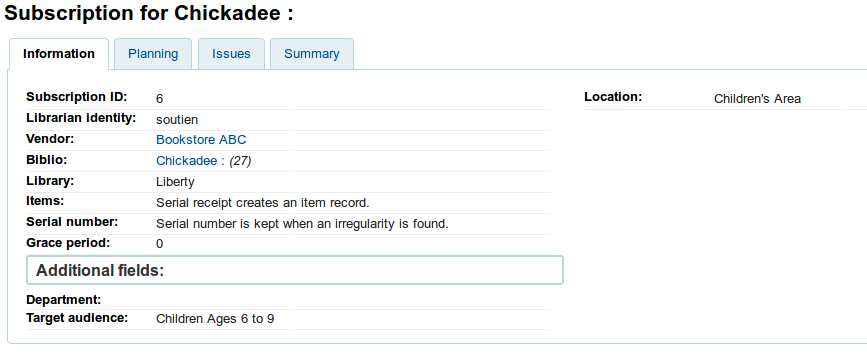
When you are adding a subscription, the field will be in the ‚Additional fields‘ section with its authorized values drop-down menu.

When you view the subscription, the field will appear under ‚Additional fields‘.
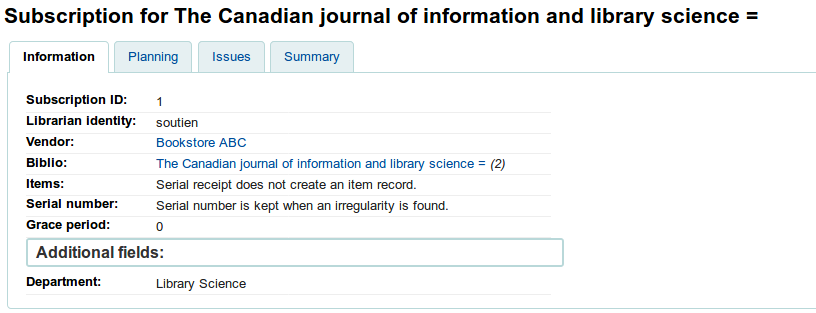
Because we made the field searchable, it will also be in the serials subscription search.
Example 2: Additional field using MARC field
This is particularly useful if you want to view bibliographic information in the subscription detail page. In this example, we will add the 521$a field, which is, in MARC21, the target audience note.
- In the ‚Name‘ field, enter ‚Target audience‘
- In the ‚MARC field‘ field, enter ‚521$a‘

Hinweis
You will not be able to edit this field from the subscription form. If you need to add or change the value in this field, you must go through the cataloging module.
When you view the subscription, the field and the information from the bibliographic record will appear under ‚Additional fields‘.
Add a subscription
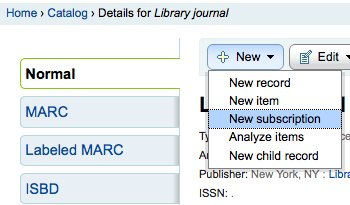
Subscriptions can be added by clicking the ‚New‘ button on any bibliographic record
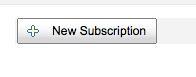
Or by visiting the Serials module and clicking ‚New subscription‘
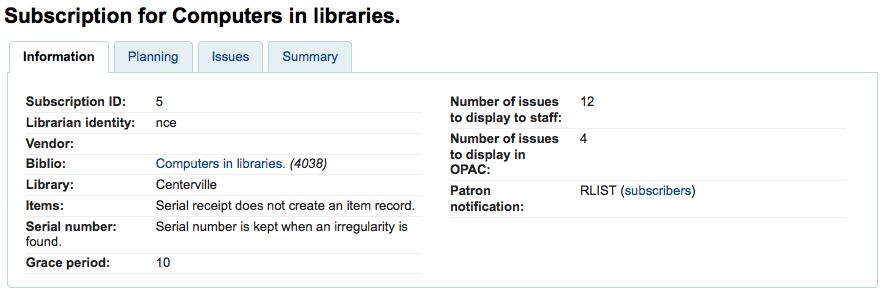
Wenn Sie ein neues Abonnement im Zeitschriftenmodul anlegen wird Ihnen eine leere Maske angezeigt (wenn Sie das Abonnement vom Titel aus anlegen ist der Titel bereits eingetragen).
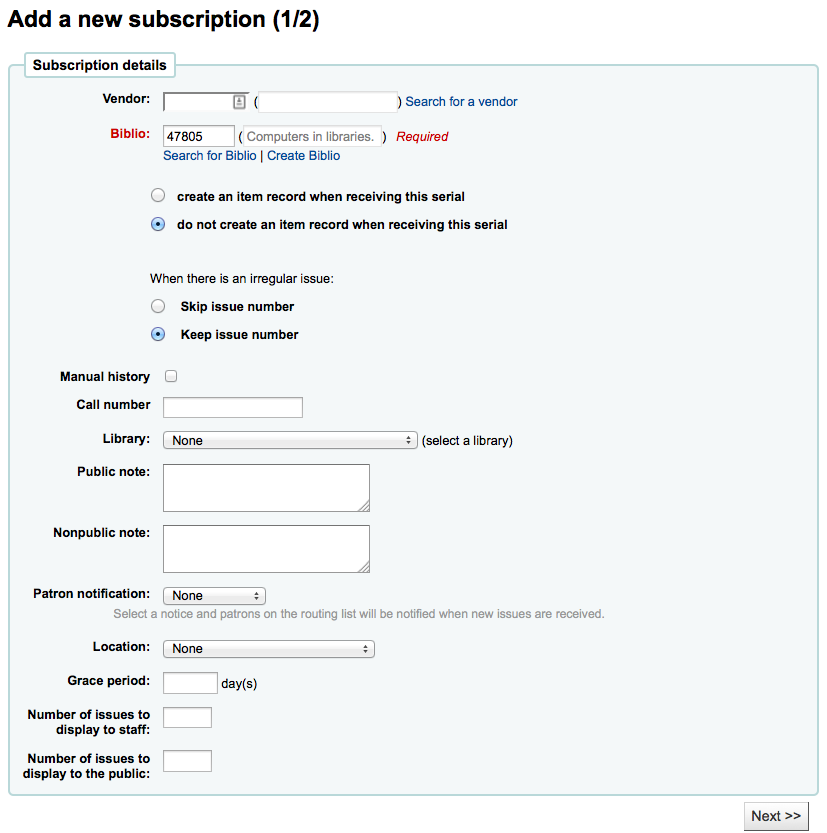
‚Mitarbeiter‘ zeigt Ihnen den Benutzernamen des angemeldeten Bibliotheksmitarbeiters
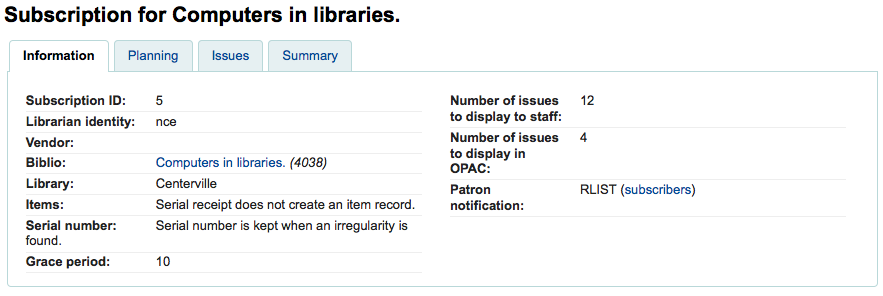
‚Vendor‘ can be found by either searching vendors entered via the Acquisitions module or entering the vendor ID number
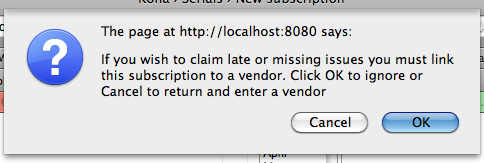
Lieferanteninformationen sind nicht erforderlich
Um Reklamationen für vermisste oder verspätete Hefte zu erzeugen, müssen Sie Lieferanten erfassen.
‚Biblio‘ is the MARC record you’d like to link this subscription to
- This can be done by searching for an existing record by clicking on the ‚Search for record‘ link below the boxes or by entering the biblionumber for a record in the first box. Only if you search will the field between the parenthesis be filled in.
Als nächstes können Sie festlegen, ob bei Zugang eines Heftes ein Exemplar angelegt werden soll (wenn Sie die Hefte mit Barcodes versehen, möchten Sie dies voraussichtlich an dieser Stelle tun)
Um Unregelmäßigkeiten im Abonnement zu verwalten, beantworten Sie die Frage ‚Wenn es ein unregelmäßiges Heft gibt‘. Wenn die Nummerierung fortlaufend ist, sollten Sie ‚Behalte Heftnummer‘ auswählen.
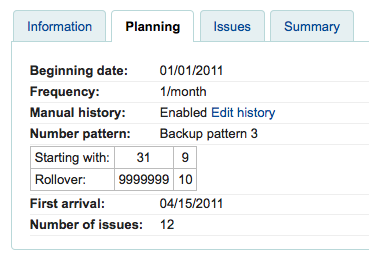
Durch Anhaken der ‚Manuellen Historie‘ können Sie auch Hefte eingeben, die außerhalb des normalen Erscheinungsverlaufs liegen. Gehen Sie dazu auf den Reiter ‚Planung‘ in den Abonnementdetails nachdem das Abonnement gespeichert wurde.
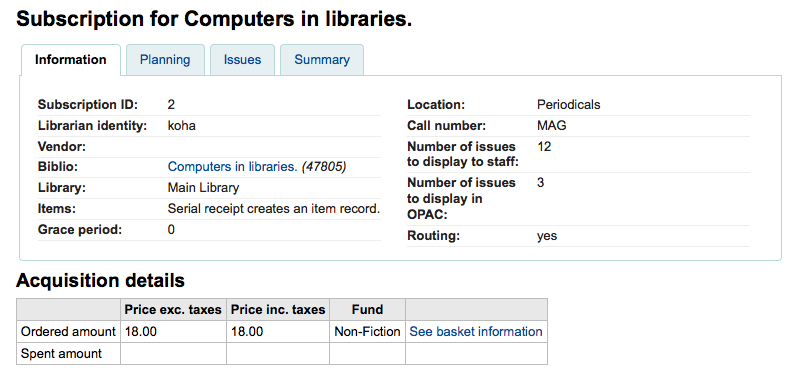
‚Call number‘ is for your item’s call number or call number prefix
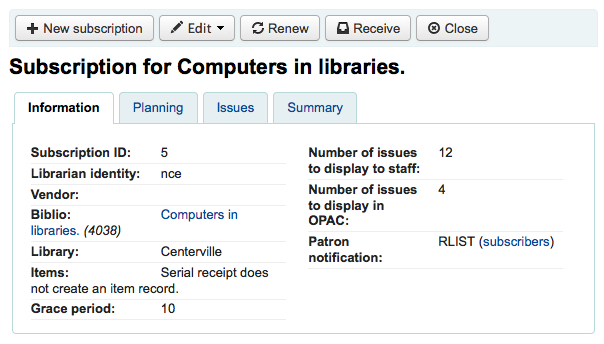
‚Library‘ is the branch that owns this subscription.
Wenn mehr als eine Bibliothek diese Zeitschrift abonniert hat, müssen Sie ein Abonnement je Bibliothek anlegen.
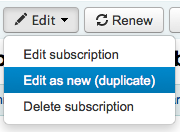
This can be done easily by using the ‚Edit as new (duplicate)‘ option found on the subscription information page and changing only the ‚Library‘ field
Use the ‚Public note‘ for any notes you would like to appear in the OPAC for the patrons
‚Nonpublic note‘ should be used for notes that are only visible to the librarians via the staff client
The ‚Patron notification‘ option lets you pick a notice to send to patrons who subscribe to updates on this serial via the OPAC.
- For this option to appear you need to make sure that you have a Routing list notice set up in the Notices Tool
‚Standort‘ ist für den Aufstellungsort
The ‚Grace period‘ is the number of days before an issue is automatically moved from ‚Expected‘ status to ‚Late‘. This mechanism requires that the SerialsUpdate.pl cron job is set up to run regularly.
The Staff and OPAC display options allow you to control how many issues appear by default on bibliographic records in the Staff Client and the OPAC
- If no values are entered in these fields, they will use the OPACSerialIssueDisplayCount and StaffSerialIssueDisplayCount system preference values
Once that data is filled in you can click ‚Next‘ to enter the prediction pattern information.
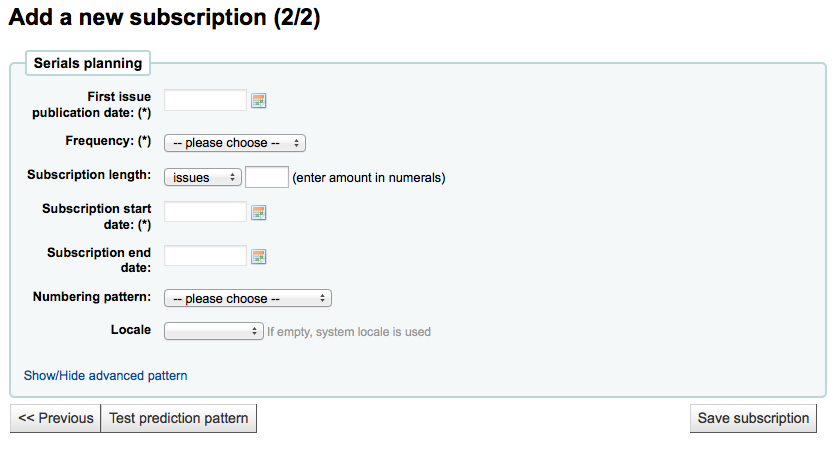
Unter ‚1. Heft‘ tragen Sie das Erscheinungsdatum des vorliegenden Heftes ein. Dies ist das Datum, mit dem das Erscheinungsmuster beginnt.
There are several pre-defined options for the ‚Frequency‘ of publication all of which are visible alongside your own custom frequencies by visiting ‚Manage frequencies‘
- Without periodicy: some very specific (usually high level science journals) don’t have a true periodicity. When you subscribe to the title, you subscribe for 6 issues, which can arrive in 1 year… or 2… There is no regularity or known schedule.
- Wählen Sie unbekannt, wenn keine der anderen Auswahlmöglichkeiten richtig ist
- Unregelmäßig: Die Zeitschrift erscheint nicht ‚regelmäßig‘, aber Sie hat eine vorhersagbare Erscheinungsweise. Sie wissen, dass die Zeitschrift im Januar, im Oktober und im Dezember erscheint. Sie ist unregelmäßig, aber die Erscheinungsdaten sind bekannt.
- 2/Tag: Zweimal täglich
- 1/Tag: Täglich
- 3/Woche: Dreimal wöchentlich
- 1/Woche: Wöchentlich
- 1/ 2 Wochen: Zweimal im Monat (vierzehntägig)
- 1/3 Wochen: Alle 3 Wochen
- 1/Monat: Monatlich
- 1/2 Monate (6/Jahr): Zweimonatlich
- 1/3 Monate (1/Quartal): Quartalsweise
- 1/Quartal (saisonal): Quartalsweise im Zusammenhang mit den Jahreszeiten (z.B. Sommer, Herbst, Winter, Frühling)
- 2/Jahr: Halbjährlich
- 1/Jahr: Jährlich
- 1/2 Jahre: Halbjährlich
‚Laufzeit‘ ist die Anzahl der Ausgaben oder Monate des Abonnements. Dieses Datum wird auch für die Verlängerungshinweise verwendet
‚Abo-Beginn‘ ist das Datum, an dem das Abonnement beginnt. Dieses Datum wird für die Verlängerungshinweise verwendet
‚Abo-Ende‘ sollte nur angegeben werden, wenn das Abonnement bereits beendet ist (falls Sie rückwirkend Zeitschriften erfassen)
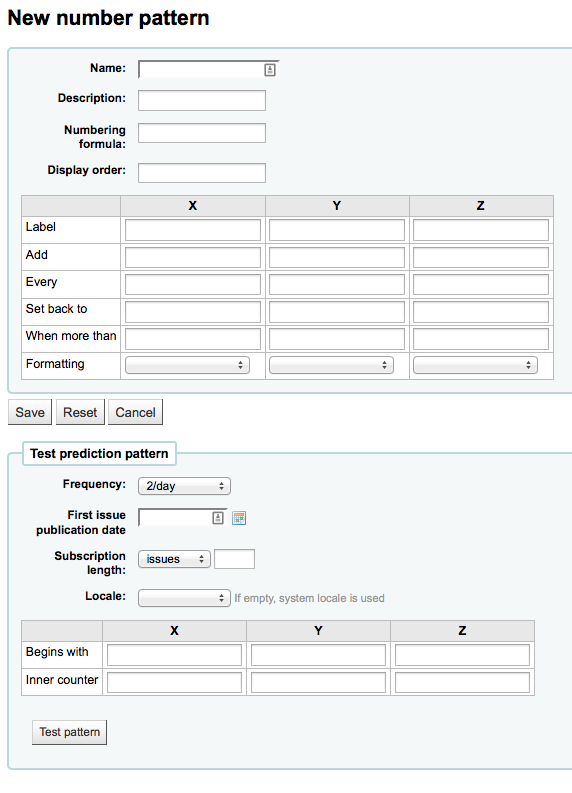
‚Numbering pattern‘ will help you determine how the numbers are printed for each issue. Patterns entered here are saved and editable at any time by visiting ‚Manage numbering patterns‘
Beginnen Sie mit der Nummer des Heftes, dass Sie in der Hand haben. Das ist die Nummer, die Sie als ‚Erstes Publikationsdatum‘ angegeben haben
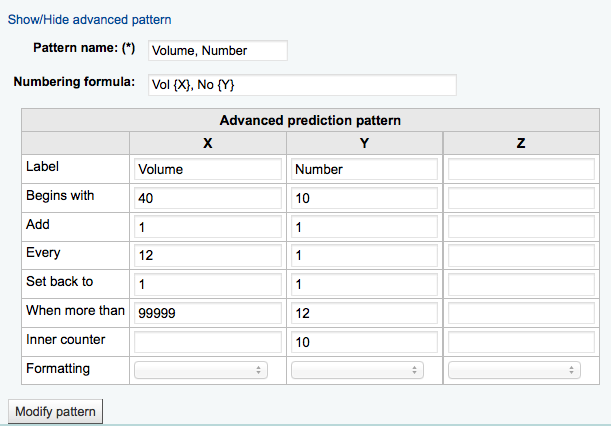
You can choose to create your own numbering pattern by choosing ‚None of the above‘ and clicking the ‚Show/hide advanced pattern‘ button at the bottom of the form
Die Option ‚Sprache‘ ist nütlich, wenn Sie Wochentage, Monate oder Jahreszeiten in Ihrer Nummerierung verwenden möchten. So können Sie zum Beispiel bei einer englischen Zeitschriften die Sprache auf ‚Englisch‘ einstelllen und die Wochentage in Englisch anzeigen lassen.
Once a ‚Numbering pattern‘ is chosen the number formula will appear.
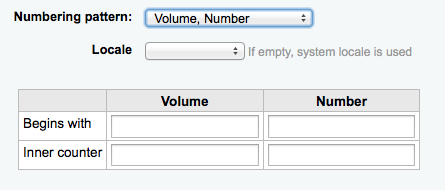
Die ‚Beginnt mit‘-Nummer ist die Nummer des Heftes, das Sie gerade in der Hand halten.
The ‚Inner counter‘ is used to tell Koha where the „receiving cycle“ starts
- Zum Beispiel: Wenn das erste Heft „Jg. 4, Nr. 1, H.. 796“ ist, müssen Sie den inneren Zähler auf 0 setzen. Aber wenn es „Jg. 4, Nr. 2, H. 797“, ist, wird der innere Zähler auf 1 gesetzt.
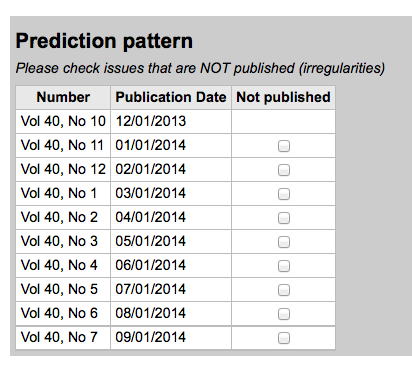
Wenn die Daten ausgefüllt sind, klicken Sie auf ‚Erscheinungsweise testen‘, um zu sehen, wie die Hefte vom System generiert werden. Wenn es Unregelmäßigkeiten gibt, können Sie in der Liste auswählen, welche Hefte nicht erscheinen werden.
If you have added a custom field, it will be editable above the buttons at the bottom of the screen
Click ‚Save subscription‘ to save the information you have entered. Find sample serial examples in the serial pattern library on the wiki.
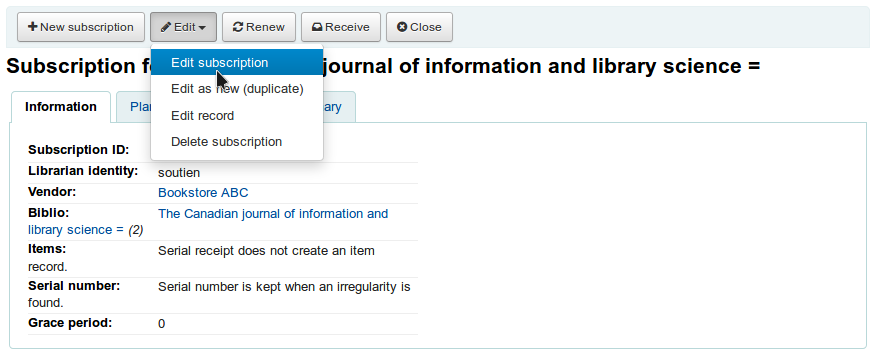
Edit a subscription
To edit a subscription, click on ‚Edit‘ and ‚Edit subscription‘ from the subscription page. This will take you back to the same form as the one used when creating a new subscription.
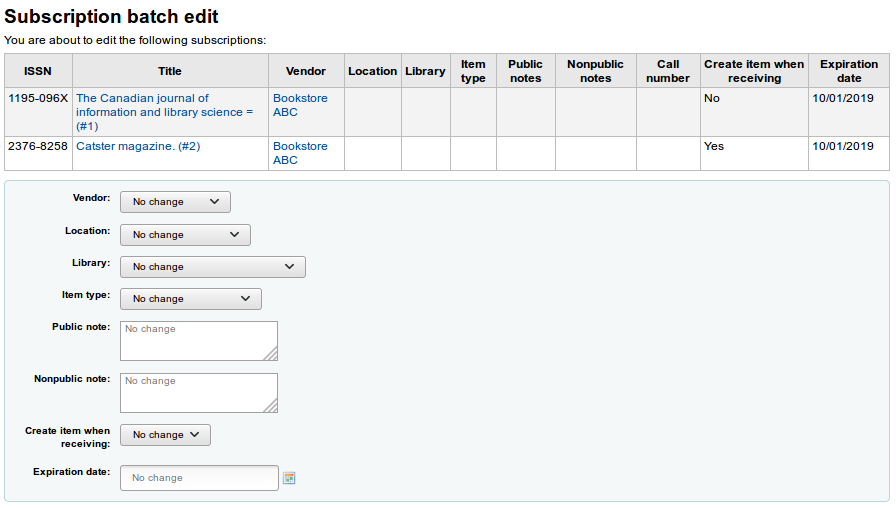
You can also batch edit subscriptions. To do so, search for the subscriptions you want to change. In the results, check the boxes next to the subscriptions to edit. The link ‚Edit selected serials‘ will appear.
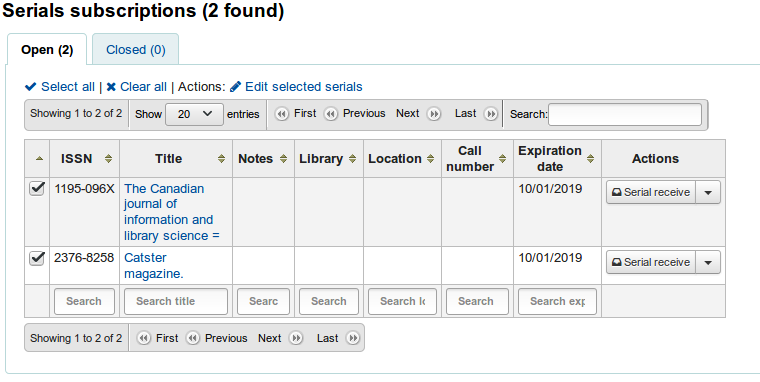
From there, you can change:
- the vendor
- the shelving location
- the library
- the item type
- the public note
- the nonpublic note
- whether or not to create an item when receiving an issue
- the expiration date
Hinweis
Leave the field unchanged to keep the original values.
Receive issues
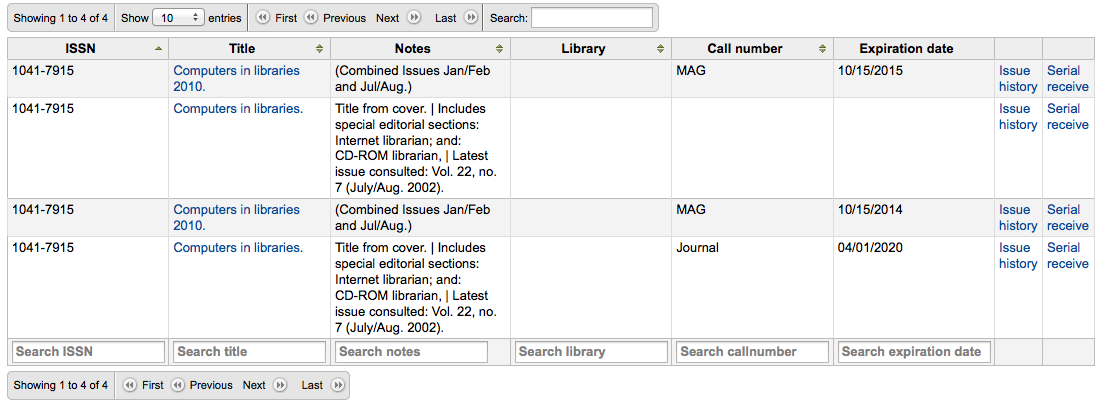
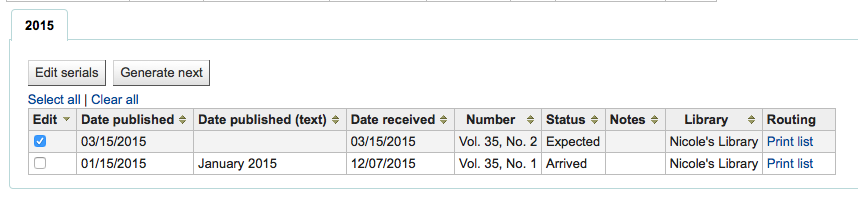
Issues can be marked as received from several locations. To find a subscription, use the search box at the top of the Serials page to search for the serial you’d like to receive issues for:
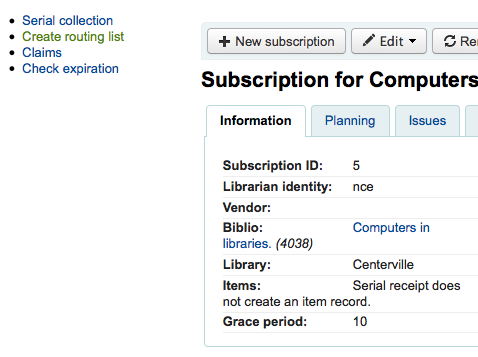
From the search results you can click the ‚Serial receive‘ link or you can click on the subscription title and then click the ‚Receive‘ button.
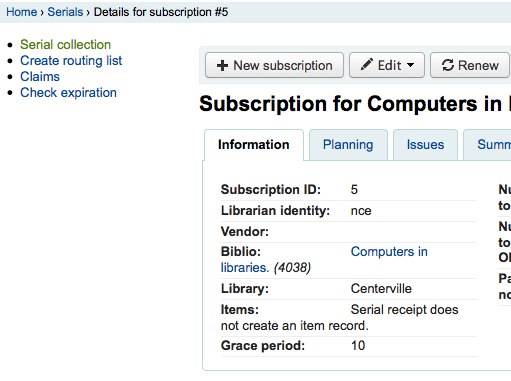
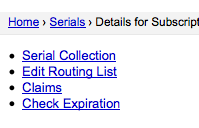
The final way to receive serials is from the ‚Serial collection‘ page. To the left of the Subscription summary page there is a menu with a link to ‚Serial collection‘
From the page that opens up you can click ‚Edit serial‘ with the issue you want to receive checked.
Alle drei Optionen öffnen das Formular für den Zugang von Zeitschriftenheften:
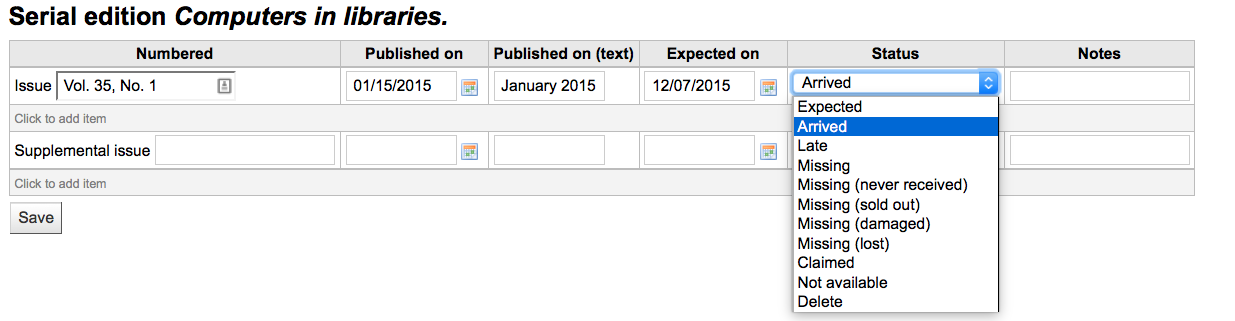
Wählen Sie ‚Eingetroffen‘ aus der Auswahlliste, um ein Heft zugehen zu lassen.
If you have decided to have an item record created for each issue an item add form will appear after choosing ‚Arrived‘
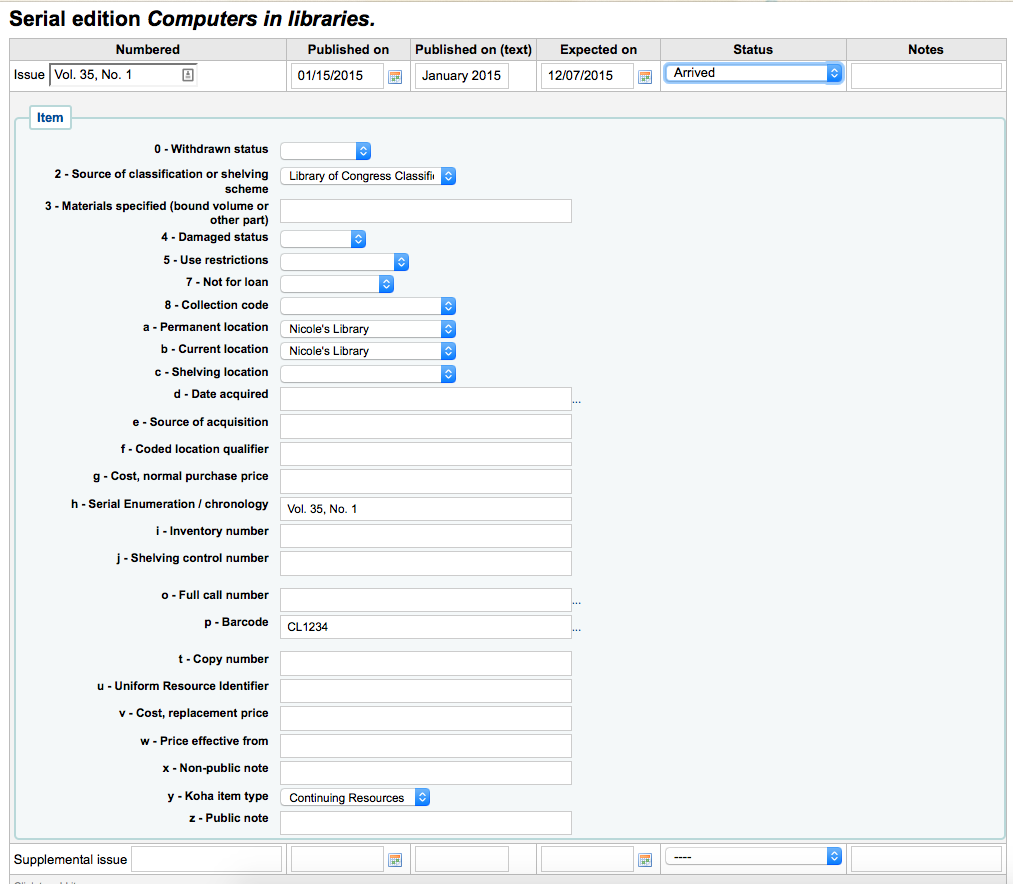
If your issue has a supplemental issue with it, fill in the Supplemental issue information.
- Key the entire numbering in the box after „Supplemental issue“ no
numbering will be inherited/auto-filled from the main issue, and
exactly what you key in the box after „Supplemental issue“ will be
auto-filled in the item record’s Serial enumeration/chronology
[MARC21 952$h] (if you create item records).
- E.g., key this in its entirety if it’s what you would like displayed: „v.69 no.3 (Mar. 2015) suppl.“
- Key the entire numbering in the box after „Supplemental issue“ no
numbering will be inherited/auto-filled from the main issue, and
exactly what you key in the box after „Supplemental issue“ will be
auto-filled in the item record’s Serial enumeration/chronology
[MARC21 952$h] (if you create item records).
If you have decided to have an item record created for each issue an item add form will appear for your supplement and for the issue itself
Geben Sie alle Daten ein und klicken Sie auf ‚Speichern‘
If you are receiving multiple issues at once, or have marked an issue as ‚Late‘ or ‚Missing‘ there you can click the ‚Generate next‘ button below the list of issues.
Wenn Sie auf diese Schaltfläche klicken, wird das nächste Heft erzeugt und das aktuell erwartete Heft automatisch auf ‚Verspätet‘ gesetzt. Über die Schaltfläche ‚Bearbeiten‘ auf der rechten Seite der Hefte können Sie einzelne oder mehrere Hefte noch weiter bearbeiten.
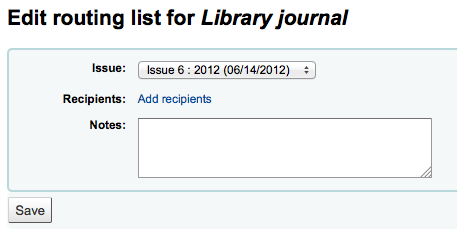
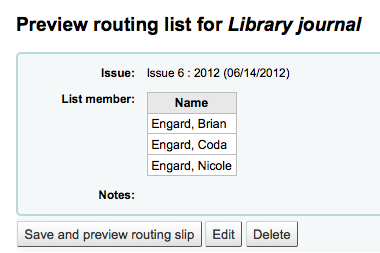
Create a routing list
A routing list is a list of people who receive the serial before it goes to the shelf. To enable routing lists you want to set your RoutingSerials preference to ‚Add‘.
When on the subscription page you will see a link to the left that reads ‚Create routing list‘ or ‚Edit routing list‘
Mit einem Klick auf diesen Link gelangen Sie in das Menü. über das Sie eine neue Umlaufliste anlegen können.
Hier können Sie über ‚Benutzer hinzufügen‘ Benutzer auf die Umlaufliste setzen. Sie können nach den Benutzern über Teile des Namens, mit der Heimatbibliothek oder dem Benutzertyp suchen.
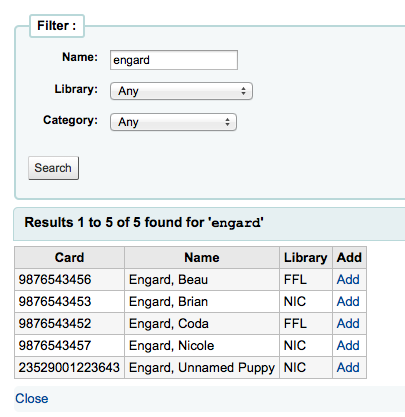
Wenn Sie auf ‚Hinzufügen‘ auf der rechten Seite des Namens klicken, wird der Benutzer zur Umlaufliste hinzugefügt. Nachdem Sie alle Benutzer auf die Umlaufliste gesetzt haben, klicken Sie auf ‚Schließen‘ um auf die Übersichtsseite zurückzukehren.
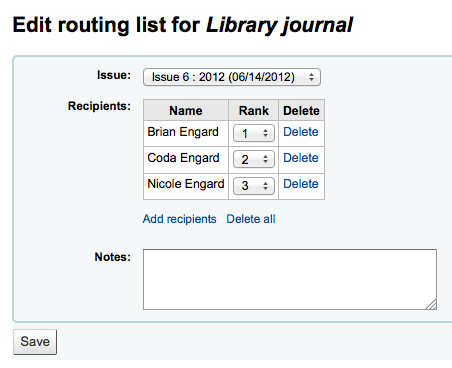
Wenn die Liste bereits so aussieht, wie Sie es möchten, klicken Sie auf ‚Speichern‘. Als nächstes wird eine Vorschau der Umlaufliste angezeigt. Klicken Sie auf ‚Speichern und Vorschau‘ um die Liste auszudrucken. Es wird die Druckansicht in einem separaten Fenster geöffnet.
If RoutingListAddReserves is set to on then patrons listed in the routing list will automatically be added to the holds list for the issue.
To see a list of all of the routing lists a specific patron is on visit the Routing lists tab on their patron record.
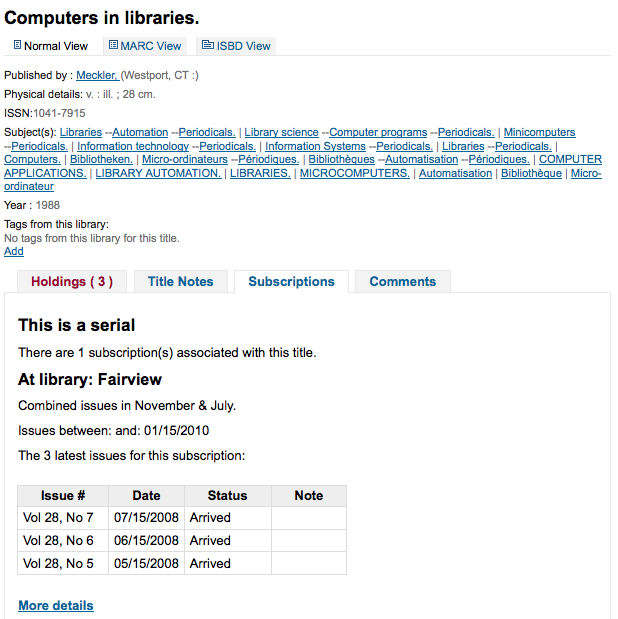
Subscriptions in staff client
Subscription information will appear on bibliographic records under the ‚Subscriptions‘ tab

Clicking the ‚Subscription details‘ link will take you to the Subscription summary page in the staff client.
If you are using the Acquisitions module to keep track of serial subscriptions you will see that info before your subscription details.
Subscriptions in OPAC
When viewing the subscription in the OPAC there will be several options.
Like in the staff client, there will be a Subscriptions tab on the bibliographic record.
Under this tab will appear the number of issues you chose when setting up the subscription or in your OPACSerialIssueDisplayCount system preference. Clicking the ‚More details‘ link will provide you with additional information about the serial history. You can set the default view of a serial in the OPAC with the SubscriptionHistory system preference.
There are two views, compact and full. The compact serial subscription will show basic information regarding the subscription
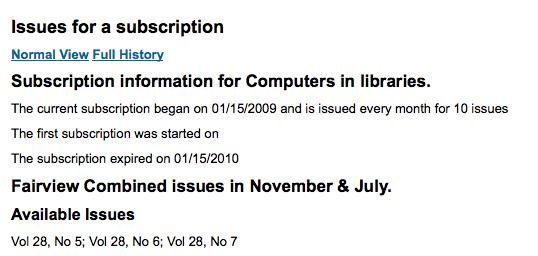
From this compact display patrons can subscribe to be notified of new issues as they are released by clicking the ‚Subscribe to email notifications of new issues‘ button. For this link to appear you will want to have chosen to notify patrons on the subscription itself.
You can see those who subscribe to new issue alerts by going to the subscription page in the staff client and looking on the right of the ‚Information‘ tab.
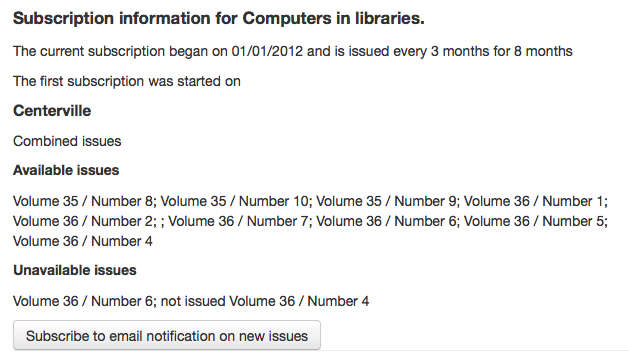
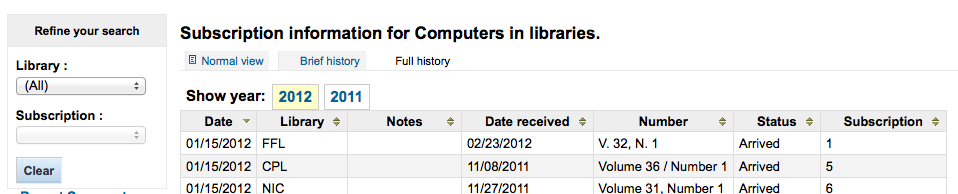
Whereas the full view shows extensive details, broken out by year, regarding the subscription
Claim late serials
Koha kann Reklamationsmails für verspätete Hefte an die Zeitschriftenlieferanten verschieken. Auf der Startseite des Zeitschriftenmoduls gibt es hierzu auf der linken Seite den Link ‚Reklamationen‘

Der Link zu den Reklamationen wird ebenfalls auf der linken Seite der Abonnementseite angezeigt
Wenn Sie noch kein Reklamationsschreiben definiert haben, wird eine entsprechende Warnmeldung angezeigt.

Unter ‚Reklamationen‘ finden Sie einen Report, mit dem Sie überfällige und fehlende Hefte für die verschiedenen Zeitschriftenlieferanten finden und Reklamationsschreiben erzeugen können.
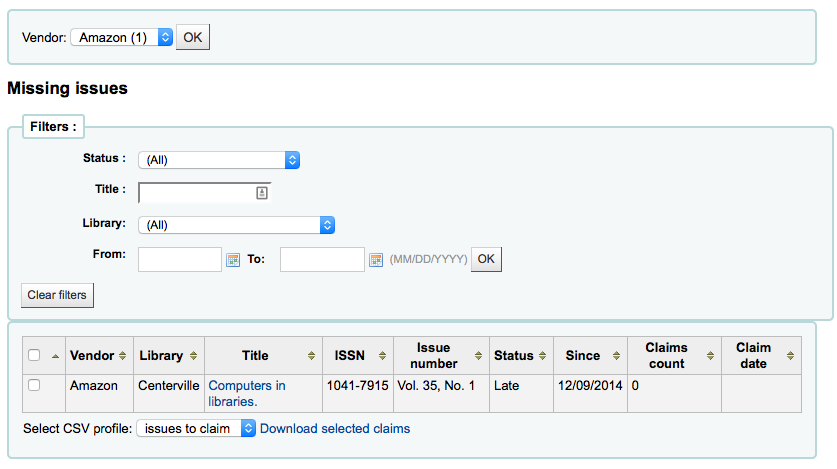
Über die Liste der verspäteten Hefte können Sie Reklamationen per E-Mail verschicken, indem Sie das Heft über die Checkbox auf der rechten Seite auswählen, ein Benachrichtigungstemplate auswählen und anschließend auf ‚Benachrichtigung versenden‘ klicken.
Check serial expiration
Wenn Sie Abonnements anlegen, geben Sie eine Abonnementlänge an, die Sie später mit der Funktion zur Überprüfung abgelaufener Abonnements recherchieren können. Klicken Sie auf ‚Ablaufdatum prüfen‘ im Zeitschriftenmenü auf der linken Seite, um die Funktion zu verwenden.

In der Suchmaske muss mindestens ein Datum angegeben werden.
In der Ergebnisliste sehen Sie alle Abonnements, die vor dem angegebenen Datum ablaufen. Von hier können Sie dann mit einem Klick entscheiden, ob das Abonnement verlänegert werden soll.

If there is more than one subscription, you can check the boxes and click on ‚Renew selected subscriptions‘ to renew all the serials. The serials will be renewed for the same amount of time as their previous subscription (i.e. if the last subscription for that serial lasted one year, the serial will be renewed for one year; if the last subscription was for 16 issues, it will be renewed for another 16 issues).

Renewing serials
If your serial subscription has expired you won’t be able to receive issues. To renew your subscription you can click the ‚Renew‘ button at the top of your subscription detail page.

Another option is to click the ‚Renew‘ link to the right of the subscription on the Serial collection page.

Once you click the ‚Renew‘ link or button you will be presented with renewal options.
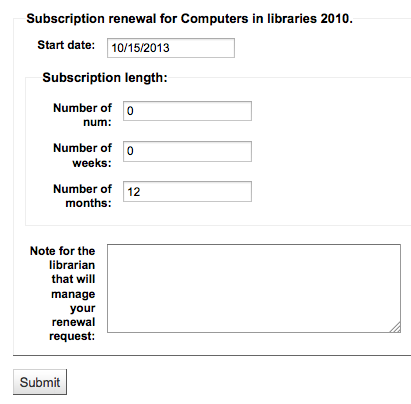
- The start date should be the date your subscription period starts.
- For the subscription length you’ll want to fill in one of the three fields presented: Number of issues, Number of months or Number of weeks.
- Finally enter any notes you might have about this renewal.
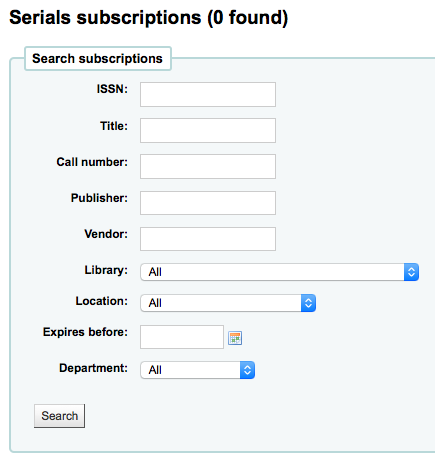
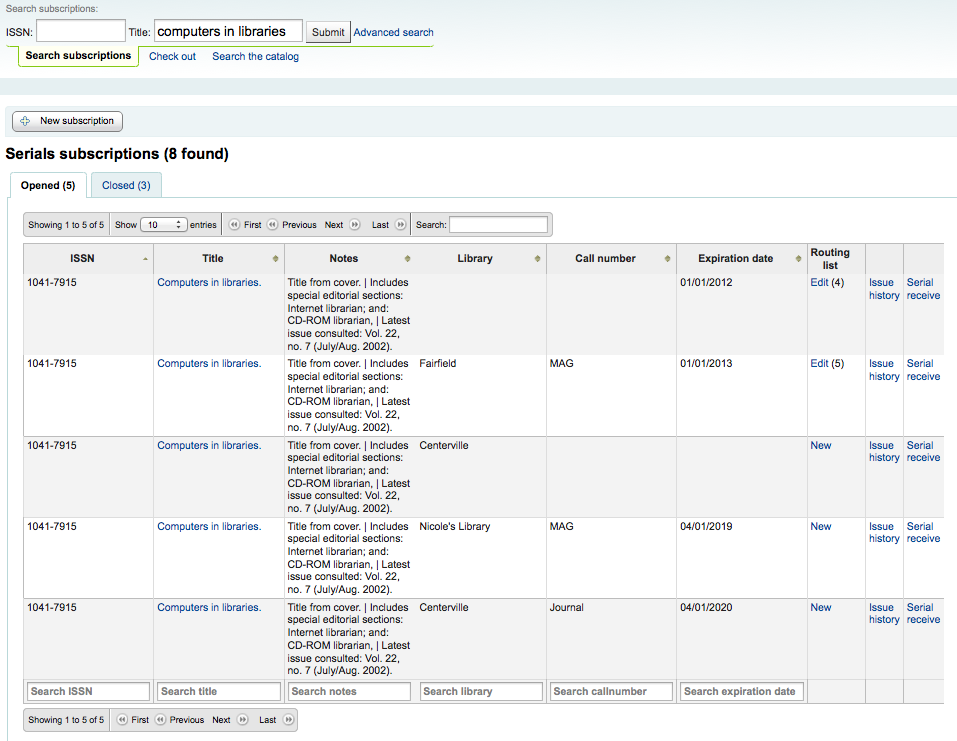
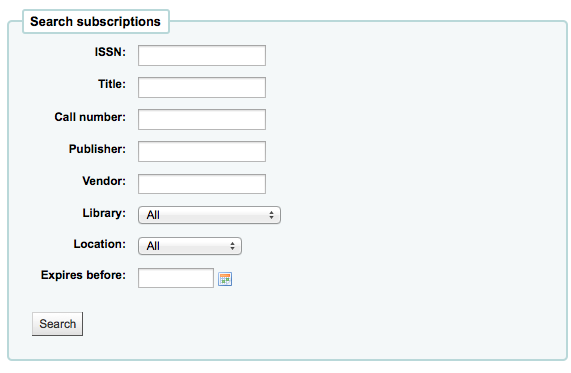
Searching serials
Once in the Serials module there is basic search box at the top that you can use to find subscriptions using any part of the ISSN and/or title.

You can also click the ‚Advanced search‘ link to the right of the ‚Submit‘ button to do a more thorough search of your serials.
From your results you can filter by using the search boxes at the bottom of each column and adjust the number of results using the toolbar at the top of the results set.